

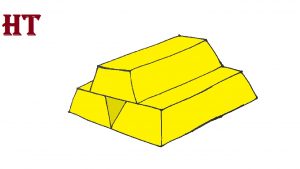
How To Draw A Gold Bar
How to Depict Gold Footstep By Step
How to Depict Gilded Easy with this how-to video and footstep-by-step drawing instructions. Easy drawing tutorial for beginners and kids.
Please see the drawing tutorial in the video below
Video produced by channel: HTDraw
You tin refer to the simple step-by-step drawing guide below
Pace i
Outset by drawing ii diagonal lines that are well-nigh parallel to each other. These lines class the summit of the gold bar.
Step two
Connect the lines at each terminate with brusk lines. Then, stretch the diagonal lines from the front of the shape, joining them to form a trapezoid. This is the front of your commencement gold bar.
Stride 3
Draw a long line from the corner of the trapezoid, parallel to the original lines. Employ a shorter line to connect it to the top corner of the bar. You at present accept a complete three-dimensional gold bar.
Stride iv
Next, use four lines to environs a rectangle around the base of the golden bar. This will class the vertices of the confined below it.
Stride v
Utilise three lines to surround a trapezoid along the front end of the rectangle, forming the front of the gilded bars.
Stride 6
Depict a line from the corner of the trapezoid, parallel to the side of the rectangle. Connect it to the corner with a short line.
Step seven
Draw an inverted triangle beneath the beginning gold bar. This will create gaps between the golden bars below.
Pace 8
Delete the guides in the triangle.
Pace 9
Draw a line through the lesser of the lower bars, through the front and side faces. And then draw lines just below the front end and side edges of the acme bar. Connect these lines to the corners of the bar with short lines.
Step 10
Colour your bars of gold. Annotation that in our example, nosotros used two different shades of yellow to create the depth, size, and shadow of the photograph.

Source: https://htdraw.com/how-to-draw-gold-step-by-step/
Posted by: cobblacce1986.blogspot.com
0 Response to "How To Draw A Gold Bar"
Post a Comment